 |
 |
 |
|
 |
|
 |
Home |
Info. |
Manuals |
Sizes |
Show |
Show |
(NEW ITEMS) |
|
|
|
|
|
|
|
Home |
Info. |
Manuals |
Sizes |
Show |
Show |
(NEW ITEMS) |
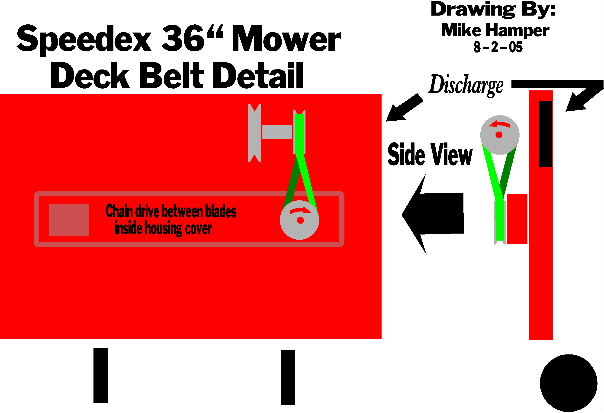 |
 ASSEMBLY AND OPERATING INSTRUCTIONS 32" for Model S-14 32" for Model S-17, S-18 & S-19 Tractor 36" for Model S-17, S-18 & S-19 Tractors Your Speeedex Underneath Rotary Mower is made to last many years. Timken bearings assure trouble free spindle units. All parts are of finest quality material, and carefully assembled to insure that you have a durable mower that will convert your Speedex Tractor into one of the best riding mowers available. Your Speedex Mower is FULL floating and should not scalp as it is free to follow the ground contour. You can attach or detach mower in seconds. These features make Speedex mowers unlike any others. BEFORE OPERATING: READ THE FOLLOWING INSTRUCTIONS CAREFULLY. MOUNTING HITCH-(SEE SKETCH) 1. Mower hitch mounts in two holes on each side of the tractor frame, approximately 7-1/2" from front axle; 1"pin points forward. Use 3/8 x 1-1/2 bolts-(2) for "T" hitch and (4) for modified "T" hitch, and "V" hitch,- to fasten hitch to frame. "T" HITCH ONLY Straight up and down position is desirable, using set screws to adjust. Mower hitch is locked in this position at all times. Never allow hitch to become loose. Check often. MOUNTING CLUTCH 1. Idler pulleys come assembled to idler shaft. Put 3/8" spacer in place. Push together until spacer touches. Insert idler pulleys in carrier as shown in sketch. Align index mark on end of idler pulley with set screw in carrier. Snug tighten set screw, final adjustment is made prior to mowing. Insert cotter pin in hole on carrier shaft. 2. Carrier, with pulleys in place, is inserted through the tube hangers in the hitch from the right side of tractor. 3. Clutch linkage and adjusting knuckle are pre-assembled. Place adjusting knuckle on left end of carrier shaft. With tab up, set screw forward and linkage rod to the outside. Shown at "B" sketch. 4. Install clutch lever by inserting bolt as shown in sketch. Use lockwasher, nut and bushing as per view, draw snug. Now put bolt through hole in tractor frame(about 12-1/2" from front of tractor frame) and tighten in place. Install linkage rod in hole in clutch lever with bend down, as shown, and lock with small cotter pin. CLUTCH ADJUSTMENT With belt in position, (engine not operating) holding idler pulleys firm against belt with a downward pressure, place clutch lever at approximately 1:00 o'clock and tighten set screw in adjusting knuckle. WARNING: There should be at least 3/8" compression on clutch spring when mower clutch in engaged. (Earlier models with short spring must have at least 1/8" spring compression.) TO MOUNT MOWER Place tractor on a smooth, hard surface. Turn steering completely to left. Place mower on right side of tractor with left rear wheel of mower just inside right rear wheel of tractor. Then place swivel hitch of mower inside right front wheel of tractor. Slide mower under tractor pivot bar on "T" or "V" hitch to line up swivel hitch (barside back). Secure with hair pin cotter. FINAL ADJUSTMENT Motor pulley may be moved in or out as required to make best possible alignment of the pulleys. To adjust the position of the belt on the angled flat idler pulley(with set screw loose) rotate the idler pulley shaft (using capscrew on shaft end).This is done with mower clutch engaged and mower running. CAUTION: USE CARE TO KEEP FINGERS AND TOOLS AWAY FROM MOVING PARTS, OR REMOVE SPARK PLUG WIRE AND CRANK ENGINE TO OBSERVE BELT POSITION. New belt should be positioned to just clear the inside flange of idler pulley. Lock set screw to hold this position. SERVICE For chain repairs use ASA40 chain. OPERATING INSTRUCTIONS 1. Before starting your mower, adjust to high cutting position with the small crank located by the left rear wheel. To engage power in drive, puch lever slowly forward. Allow mower to run a few minutes to seat belt and free spindles. NOTE: ALWAYS DISENBABE MOWER CLUTCH BEFORE STARTING ENGINE. If transporting for any great distance, remove belt from pulley (transport kit is available). 2. Oil the chain by using an oil can in the space under the horizontal pulley. The mower should be running so the entire chain will be oiled. Always oil before storage to prevent rust. Mower chain should be oiled at least every hour of operation. If chain becomes loose, tighten by moving left spindle. Excessive sprocket wear can occur if chain runs too loose. 3. Grease well before putting mower into use and frequently enough to insure grease will reach the top bearings at all times. The life of your mower depends on this. Grease fittings for spindles are accessible from the underside of mower. 4. After mowing, remove mower from tractor, This allows easy cleaning and good maintenance means a long life for the mower. Oil all points of wear on leveling mechanism. WHAT TO LOOK FOR If mower runs unusually stiff-indicated by a laboring motor, it should be TAKEN OFF and inspected for freedom of spindles. Wrapping of grass or foreign material on spindle can restrict motion of spindle, thus causing excessive belt slippage. If belt slips, follow previous instruction under "Clutch Adjustment". If chain is broken, remove cover screws. (Pulley does not have to come off to remove cover.) At reassembly, both spindles must be loosened. Set blades at 90 degrees for correct timing. Both spindles must be adjusted to tighten chain. Tighten all nuts to maintain chain setting. Check blade clearance. Keep blades sharp for high efficiency-dull blades consume a lot of power and damage the grass roots. Under normal grass conditions you may mow at any speed consistant with ground hazards. If unusually heavy growth causes motor to labor, you may do the following: 1. Slip the clutch on the tractor in order to hold high RPM on mower and reduce the ground speed, or downshift variable speed (S-17 only) by holding variable speed clutch handle and pressing tractor clutch pedal back (using heel) until variable releases (let variable clutch handle go forward to desired speed and press tractor clutch pedal forward. Release variable clutch handle.) For S-18 and S-19, choose a gear range to suit. 2. You may cut a part swath consistant with continuous operation. REVISED 11-24-71 12-22-71 4-10-72 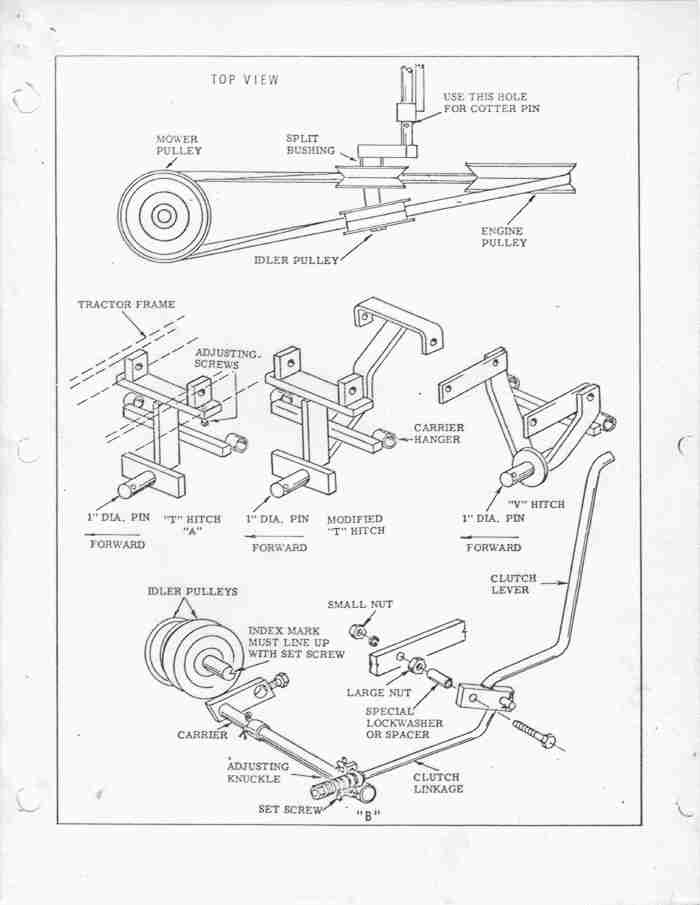 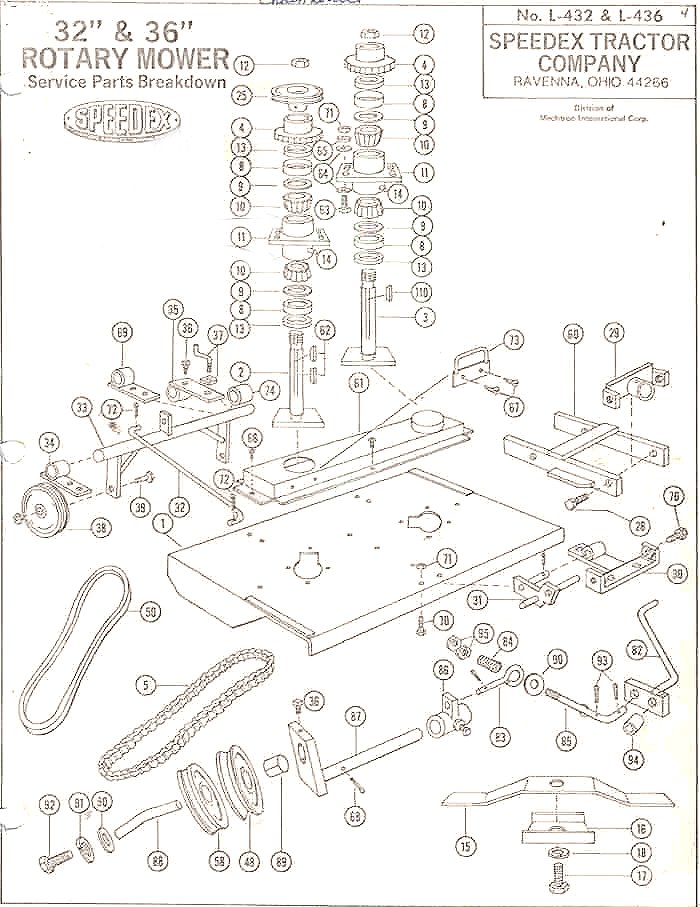 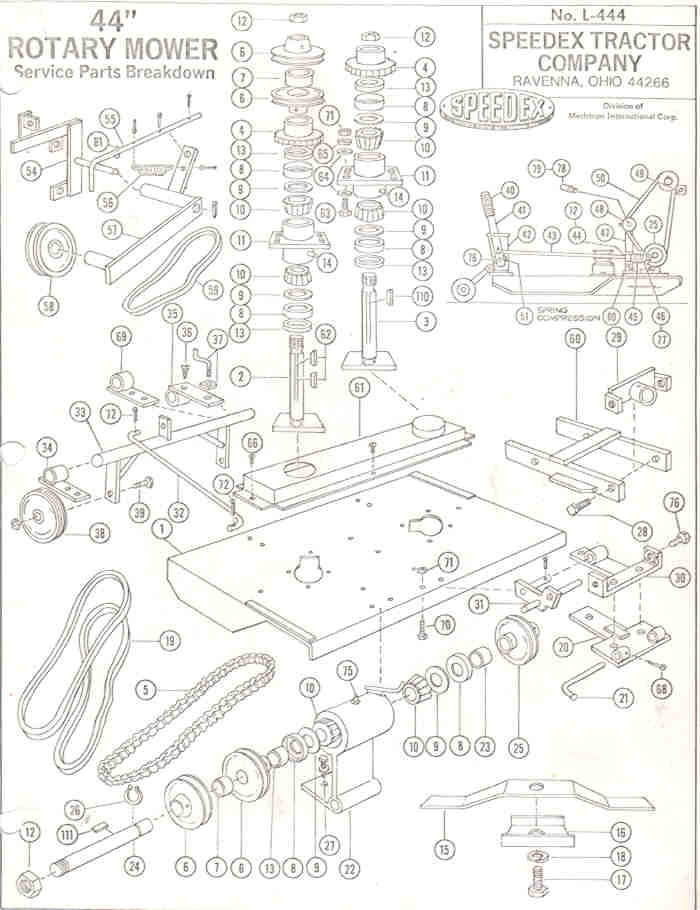 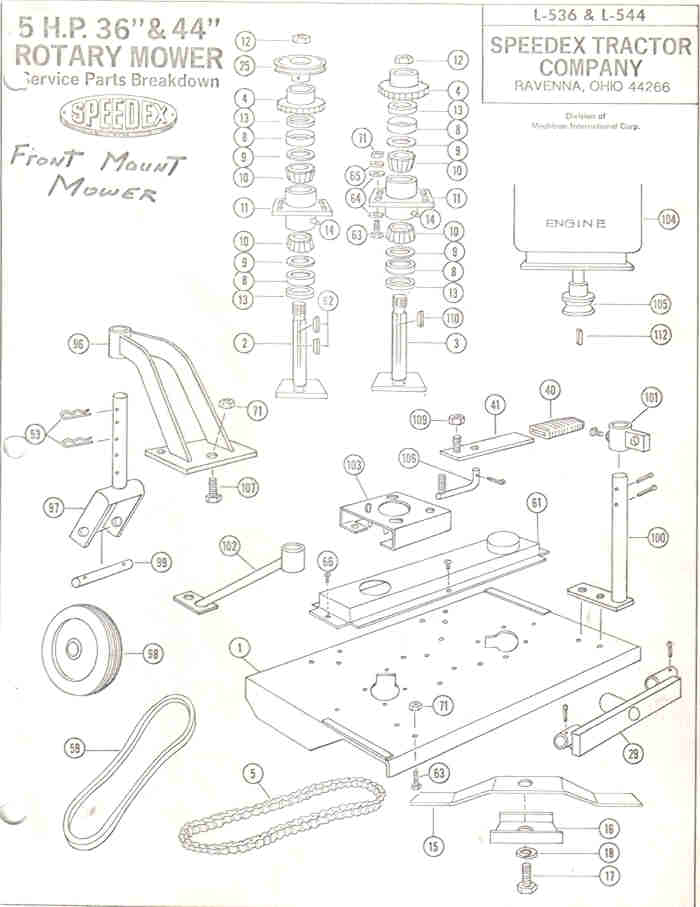 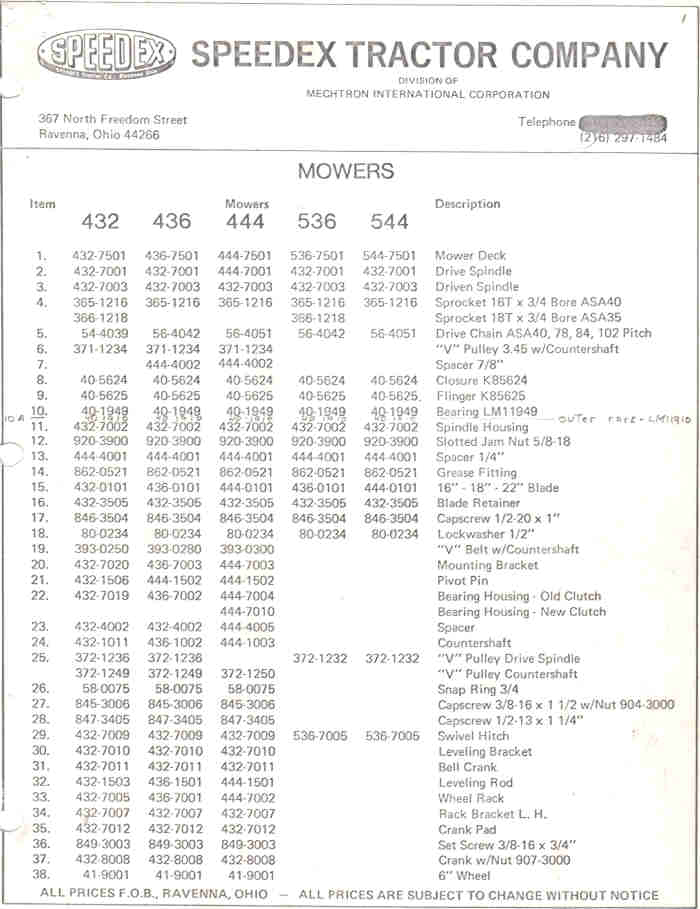 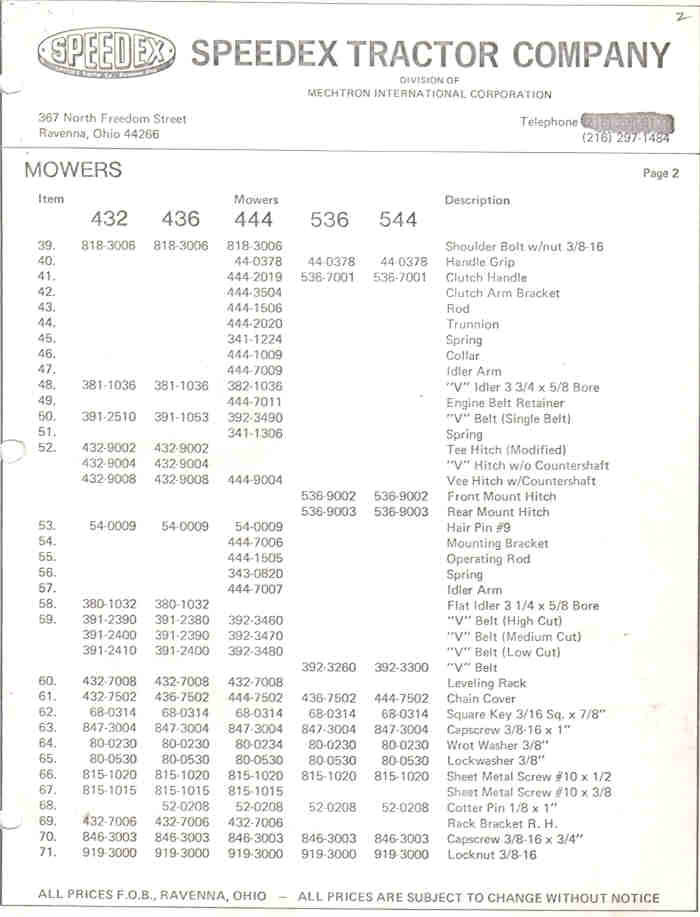  | Tractor Print | Mowers | | Return Home | Contact Info. | Tractor Manuals | Belt Sizes | Spring Show | Fall Show | Decals (NEW ITEMS) | |
||
